Showing posts with label Technology. Show all posts

Facebook- hack- Cookie Stealing Attack.

Posted by Varatha krishnan On Monday, May 20, 2013 0 comments

In this tutorial i will explain how you can hack a Facebook/twitter accounts by stealing cookies. This method works only when the victims computer is in a LAN (local area network ).Best place to try out this is in schools ,collages ,cafes . where computers are connected in LAN .Before i proceed let me first explain cookies.

What Are Cookies ? And What Is The Use Of Stealing Cookies ?

Cookies are small files that stored on users computer by websites when a user visits them. The stored Cookies are used by the web server to identify and authenticate the user .For example when a user logins in Facebook a unique string is generated and one copy of it is saved on the server and other is saved on the users browser as Cookies. Both are matched every time the user does any thing in his account

So if we steal the victims cookie and inject them in our browser we will be able to imitate the victims identity to the web server and thus we will be able to login is his account . This is called as Side jacking .The best thing about this is that we need not no the victims id or password all we need is the victims cookie.

Hack Facebook / Twitter By Stealing Cookies ?

1. Ettercap or Cain and able for ARP poisoning the victim
2. Wire shark for sniffing and stealing cookies
3. Firefox browser and Cookie logger add on for injecting the stolen cookies in our browser

1. First ARP poison the victim .For this you can refer my previous articles on how to ARP poison the victims computer using Cain and able or Ettercap

2. After ARP poisoning open Wire shark ,click capture button from the menu bar , then select interface .Now select your interface (usually eth0 ) finally click start capture .

3. Now you can see the packets being captured , wait for a while till the victim logs in his account( Facebook /twitter ),

4. Mean while Find the IP address of Facebook ,for this you can open CMD (command prompt ) and enter .Ping Facebook.com to find its IP address.

5. Now filter the packets by entering the the IP address (Facebook) in the filter bar and click apply 

6. Now Locate HTTP Get /home.php  and copy all the cookie names and values in a notepad.
7. Now open Firefox and open add and edit cookies ,which we downloaded earlier , add all the cookie values and save them.

 8. Now open Facebook in a new tab , you will be logged in the victims account .


Varatha krishnan ......you have hacked the victims Facebook account by stealing cookies , You can also follow the same steps to hack  Twitter accounts


Hope you enjoyed this tutorial , If you have any doubts please feel  free to post a comment.


Note: This tutorial is only for Educational Purposes, I did not take any responsibility of any misuse, you will be solely responsible for any misuse that you do. Hacking email accounts is criminal activity and is punishable under cyber crime and you may get upto 40 years of imprisonment, if got caught in doing so. 

READ MORE

Free Sharing of Large Files Directly from 1PC To other PC using Browser Without Uploading..!!

Posted by Varatha krishnan On Saturday, May 18, 2013 0 comments


Share Large Files Directly Pc To Pc Using Web Browser Without Uploading Anywhere

FilesOverMiles website is a nice tool for direct file sharing, fast and secure way to transfer files over the Internet. No setup or sign up and the file transfers are not stored anywhere. It will appeal to many professionals who want to share files securely and efficiently.

Step 1 : Go to FilesOverMiles website. Click "Browse" and select the file to transfer.

Step 2 : As soon as you select the file, the site will generate an unique URL which you have to share with the user to want to send the file to.

Step 3 (2nd User) : The PC on the receiving end of this file transfer must go this unique url which will show a download option from the file to be transferred PC to PC.

Note : The transfer file will continue to be available for download until the web page on 1st user’s browser is closed.

This way you can securely transfer files of any size through one pc to another from your browser. No need to upload anywhere.
READ MORE

Facebook Crack- Post any picture or status on any account.!!

Posted by Varatha krishnan On 0 comments


I'm going to be teaching you how to hack someones status on Facebook. This method is very simple and I will include pictures in this tutorial. You can find them by clicking the "spoiler" text.
What you need;

A Hotmail or Gmail email.

Step 1) Go to m.facebook.com/upload.php / you will see a unique email under "post it by email" That is your unique email. What we are trying to do is getting your victims unique email by social engineering them, I will post an example below in step number 2.


[Image: 1V9p5]

Step 2) Get in contact with your slave. Send him a message saying something like "Hey Can you tell me the email on this page : www.m.facebook.com/upload.php, I need it so I can upload something via my email." You can create your own method for this. Another method would be using this email spoofer "http://emkei.cz/" and sending them a message filling out the name. For example, From name: Facebook Staff, From email: facebook.com, etc asking them for the email at m.facebook.com/upload.php


Step 3) Once you have SE'd your victims unique email, go to your hotmail/gmail account and send an email to the unique email he gave you. In the subject box is the status you want to come up on his wall, eg; "text here" the main box is for the picture attachment you want to attach, I don't think you can upload more than 1 image per status, you'll have to try it out :). Once you send it, it will appear on his wall, simple as that. 


[Image: 1VarR] 


Note: This tutorial is only for Educational Purposes, I did not take any responsibility of any misuse, you will be solely responsible for any misuse that you do.
READ MORE

Change Your IP Address without using any software.!!

Posted by Varatha krishnan On Thursday, May 16, 2013 0 comments

How to change ip address in less then a minute. For now it will take 2 to 3 minutes but with some practice you can do this within a minute.

Click on "Start" in the bottom left corner of the screen. 

Click on "RUN"

Type in "command" and click OK

You should be now at MSDOS prompt Screen ?

Type "ipconfig /release" just like that, and press "enter"

Type "exit" and leave the prompt

Right-click on "Network Places" or "My Network Places" on your desktop.

Click on "properties"

Now you should be on a screen with something titled "Local Area Connection", or something similar to that, and, if you have a network hooked up, all of your other networks ?

Right click on "Local Area Connection" and click "properties"

Double-click on the "Internet Protocol (TCP/IP)" from the list under the "General" tab

Click on "Use the following IP address" under the "General" tab

Create an IP address (It doesn't matter what it is)

Press "Tab" and it should automatically fill in the "Subnet Mask" section with default numbers.

Press the "Ok" button here

Hit the "Ok" button again

Now you should be back to the "Local Area Connection" screen ?

Right-click back on "Local Area Connection" and go to properties again.

Go back to the "TCP/IP" settings

This time, select "Obtain an IP address automatically"

Click on "Ok"

Hit "Ok" again.

Now you have a New IP address.


This tutorial is only for Educational Purposes, I did not take any responsibility of any misuse, you will be solely responsible for any misuse that you do. 

READ MORE

Make Folders Invisible within 30 seconds without Using Any Software..!!!

Posted by Varatha krishnan On Wednesday, May 15, 2013 0 comments


Guys, as you can guess with this trick you can make your folders invisible without using any sophisticated software. This is a very unusual & easy trick to make your private folders invisible to others.

A folder contains two parts; an icon and a name.
So to make the folder invisible you will have to make both the icon & the name invisible.

Making The Name Invisible:
Select the folder which you want to make invisible. Press F2 key then type ALT+0160and hit enter key. You will notice that the name of the folder has become invisible. See the snapshot below.


Making The Icon Invisible:
Right click on the folder whose name you made invisible. Go to Properties, then go to the Customize tab. Then click on the Change Icon button. Select any blank icon there. Remember there will be many blank icons (see snapshot). Just choose any one. ClickOK.

Your folder is now invisible! Now only you know where the folder is located.
READ MORE

Working gun made with 3D printer fully explained.

Posted by Varatha krishnan On Saturday, May 11, 2013 0 comments

The world's first gun made with 3D printer technology has been successfully fired in the US.
The controversial group which created the firearm, Defense Distributed, plans to make the blueprints available online.
The group has spent a year trying to create the firearm, which was successfully tested on Saturday at a firing range south of Austin, Texas.
Anti-gun campaigners have criticised the project.
Europe's law enforcement agency said it was monitoring developments.
Victoria Baines, from Europol's cybercrime centre, said that at present criminals were more likely to pursue traditional routes to obtain firearms.
She added, however: "But as time goes on and as this technology becomes more user friendly and more cost effective, it is possible that some of these risks will emerge."
Defense Distributed is headed by Cody Wilson, a 25-year-old law student at the University of Texas.
Mr Wilson said: "I think a lot of people weren't expecting that this could be done."
3D-printed gun partsThe gun was assembled from separate printed components made from ABS plastic - only the firing pin was made from metal
3D printing has been hailed as the future of manufacturing.
The technology works by building up layer upon layer of material - typically plastic - to build complex solid objects.
The idea is that as the printers become cheaper, instead of buying goods from shops, consumers will instead be able to download designs and print out the items at home.
But as with all new technologies, there are risks as well as benefits.
Personal liberties
The gun was made on a 3D printer that cost $8,000 (£5,140) from the online auction site eBay.
It was assembled from separate printed components made from ABS plastic - only the firing pin was made from metal.
Mr Wilson, who describes himself as a crypto-anarchist, said his plans to make the design available were "about liberty".
He told the BBC: "There is a demand of guns - there just is. There are states all over the world that say you can't own firearms - and that's not true anymore.
"I'm seeing a world where technology says you can pretty much be able to have whatever you want. It's not up to the political players any more."
Asked if he felt any sense of responsibility about whose hands the gun might fall into, he told the BBC: "I recognise the tool might be used to harm other people - that's what the tool is - it's a gun.
"But I don't think that's a reason to not do it - or a reason not to put it out there."
Gun control
To make the gun, Mr Wilson received a manufacturing and seller's licence from the US Bureau of Alcohol, Tobacco, Firearms and Explosives (ATF).
Donna Sellers, from the ATF, told BBC News that the 3D-printed gun, as long as it was not a National Firearms Act weapon (an automatic gun, for example), was legal in the US.
She said: "[In the US] a person can manufacture a firearm for their own use. However, if they engage in the business of manufacture to sell a gun, they need a licence."
Amid America's ongoing gun debate in the wake of the shootings at Sandy Hook Elementary School in Newtown, Connecticut, US congressman Steve Israel recently called for a ban on 3D guns under the Undetectable Firearms Act.
Groups looking to tighten US gun laws have also expressed concern.
Leah Gunn Barrett, from New Yorkers Against Gun Violence, has said: "These guns could fall into the hands of people who should not have guns - criminals, people who are seriously mentally ill, people who are convicted of domestic violence, even children."
3D printing technology has already been used by some criminal organisations to create card readers - "skimmers" - that are inserted into bank machines.
Many law enforcement agencies around the world now have people dedicated to monitoring cybercrime and emerging technologies such as 3D printers.
Ms Baines from Europol said: "What we know is that technology proceeds much more quickly than we expect it to. So by getting one step ahead of the technological developments, we hope and believe we will be able to get one step ahead of the criminals as well."

source:-bbc.co.uk
READ MORE

How to remove thumbs.db on windows step by step tips.

Posted by Varatha krishnan On Wednesday, May 8, 2013 0 comments
If you are windows user and if you are using hidden and super hidden files then you have a got your image and movie files folder of thumbs.db.from which your pc wil be slowed down and you have to face many types of problem. .

.These are following step below to remove thumbs.db
STEP:11.click the start bottom and find the control panel and in
search folder option, XP

2. select the "view" tab

3.and select the show hidden files and folder
and click "do not cache thumbnals"and click apply ok.


in windows vista and windows 7 user.
1.click the start bottom and find the control panel and in

2. select the view tab.

3.check the option "always show icons, never thumbnals"
and also select show hidden files and folder

Note: You do not need to do this option to disable thumbnails.
7. Now use “Disk Cleanup” to remove all of the thumbnails from the machine.
8.windows Explorer” type in the address bar “%LocalAppData%\Microsoft\Windows.
9. Right click on the “Explorer” folder and click “Properties”.
 In the folder’s properties window select the “Security” tab and click the “Advanced” button
.%LocalAppData%\Microsoft\Windows.
10. On the “Permissions” tab click
11. Uncheck the “Include inheritable permissions from the object’s parent”.
12. Click the “Remove” button in the windowssecurity box that pops-up.
13. On the “Permissions” tab click "the “OK” button.
14. Select “Yes” for the “Windows Security” pop-up  
windows and go back to “Folder Options” in the “Control Panel”.
15. Uncheck the “Always show icons, never thumbnails”.
STEP:2.1.Go to the start menu "run" and 
2.type gpedit:MSC and ok
3.after that in which open folder "Group policy Editor" 
4. Go to just left and side option.
5.select option Configuration/Administrative Template/windows
components/windows Explorer.
6.and long list open in which find option Turn-off caching of thumbnail pictures
on double click.
7.after that click Enable and Go to apply
8.click ok.
READ MORE

Windows 8 consumer preview new hotkeys - updated post

Posted by Varatha krishnan On 0 comments
The new updated hot keys are given below.

READ MORE

How to easily install windows server 8 step by step..

Posted by Varatha krishnan On 0 comments

1. Insert the appropriate Windows Server 2008 installation media into your DVD drive.
2. Reboot the computer.


3. When prompted for an installation language and other regional options, make your selection and press Next.


4. Next, press Install Now to begin the installation process.


5. Product activation is now also identical with that found in Windows Vista. Enter yourProduct ID in the next window, and if you want to automatically activate Windows the moment the installation finishes, click Next.


If you do not have the Product ID available right now, you can leave the box empty, and click Next. You will need to provide the Product ID later, after the server installation is over. Press No.


6. Because you did not provide the correct ID, the installation process cannot determine what kind of Windows Server 2008 license you own, and therefore you will be prompted to select your correct version in the next screen, assuming you are telling the truth and will provide the correct ID to prove your selection later on.


7. If you did provide the right Product ID, select the Full version of the right Windows version you're prompted, and click Next.
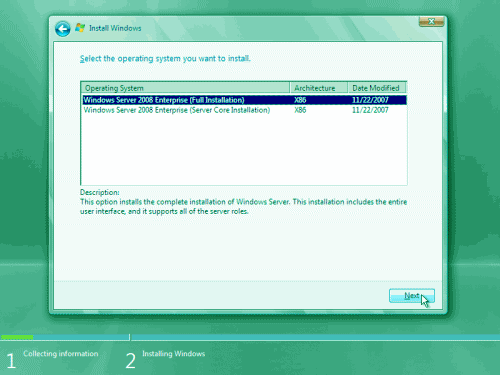


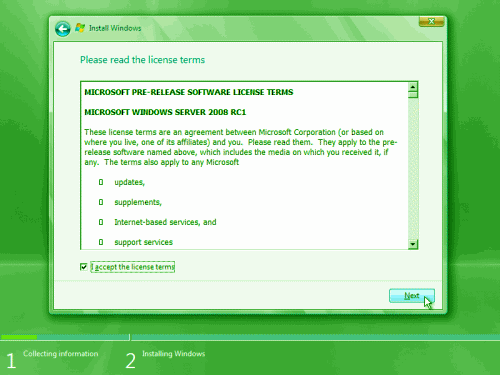
8. Read and accept the license terms by clicking to select the checkbox and pressing Next.


9. In the "Which type of installation do you want?" window, click the only available option –Custom (Advanced).


10. In the "Where do you want to install Windows?", if you're installing the server on a regular IDE hard disk, click to select the first disk, usually Disk 0, and click Next.


11. The installation now begins, and you can go and have lunch. Copying the setup files from the DVD to the hard drive only takes about one minute. However, extracting and uncompressing the files takes a good deal longer. After 20 minutes, the operating system is installed. The exact time it takes to install server core depends upon your hardware specifications. Faster disks will perform much faster installs… Windows Server 2008 takes up approximately 10 GB of hard drive space.


The installation process will reboot your computer, so, if in step #10 you inserted a floppy disk (either real or virtual), make sure you remove it before going to lunch, as you'll find the server hanged without the ability to boot (you can bypass this by configuring the server to boot from a CD/DVD and then from the hard disk in the booting order on the server's BIOS)


12. Then the server reboots you'll be prompted with the new Windows Server 2008 type of login screen. Press CTRL+ALT+DEL to log in.


13. Click on Other User.

14. The default Administrator is blank, so just type Administrator and press Enter.

15. You will be prompted to change the user's password. You have no choice but to press Ok.

16. In the password changing dialog box, leave the default password blank (duh, read step #15…), and enter a new, complex, at-least-7-characters-long new password twice. A password like "topsecret" is not valid (it's not complex), but one like "T0pSecreT!" sure is. Make sure you


.


READ MORE

How to delete older messages by auto delete script on gmail- free download..!!!

Posted by Varatha krishnan On Tuesday, May 7, 2013 0 comments
The presence of Trash and the Spam folders in your Gmail Account makes to face a lots of 
problem in your mail box. Therefore now you can delete automatically your older mails from your mail box. 

To get solution  (Download)


READ MORE

How to repair Microsoft Office 2010 easily within few minutes.

Posted by Varatha krishnan On 0 comments

When you have problems with any programs installed as part of the Microsoft Office 2010, try Microsoft Office 2010 repair option and see if that resolves the issue. To repair a Microsoft Office 2010 installed on a Windows Vista, click Start menu –> Control Panel –> Click the Programs link. Then, Navigate to Programs and features and click the link. This would display the Uninstall or Change Programs window as shown below.
image
Navigate and highlight the Microsoft Office installed program such as Microsoft Office Home and Business 2010 (This depends on the Office software installed on your system). Click the Change button available at the top. This would display the following window with repair options
image
Select Repair radio option and click the Continue button. The following Configuration Progress window will be showed.
image
After completing the repairing process a confirmation window ill be displayed. This process would require a system reboot as well.
image
READ MORE

How to restore in windows 8-steps and tips

Posted by Varatha krishnan On 0 comments

System Restore isn't available for Windows RT.(Hardware & drivers)

1. Swipe in from the right edge of the screen, and then tap Search.

(If you're using a mouse, point to the upper-right corner of the screen, move the mouse pointer down, and then click Search.) Enter Recovery in the search box, tap or click Settings, and then tap or click Recovery

2. Tap or click Open System Restore, and follow the prompts.


To refresh your PC


1. Swipe in from the right edge of the screen, tap Settings, and then tap Change PC settings.
(If you're using a mouse, point to the upper-right corner of the screen, move the mouse pointer down, click Settings, and then click Change PC settings.)

2. Under PC settings, tap or click General.

3. Under Refresh your PC without affecting your files, tap or click Get started.

4. Follow the instructions on the screen.


READ MORE